topics
- Home
- Partner Platform
- Using the Partner Platform as an Azure Service Provider
Configure EA Bill Splitting
January 7, 2025
Complete the following steps to configure your Enterprise Agreement (EA) bill splitting for Azure account with the CloudHealth Platform.
- Configure Enrollment
- Create and Configure Customer Tenant
- Bill Customers Using Microsoft EA Partner Billing Rules
- Register CloudHealth App with Service Principal
- Assign an Enrollment Reader Role to the Service Principal
- Add Reader Role for Subscriptions
- Connect Service Principal in CloudHealth
- Assign a Reader Role to Azure Savings Plans
- Configure Application Permission for Azure AD User Collection (Optional)
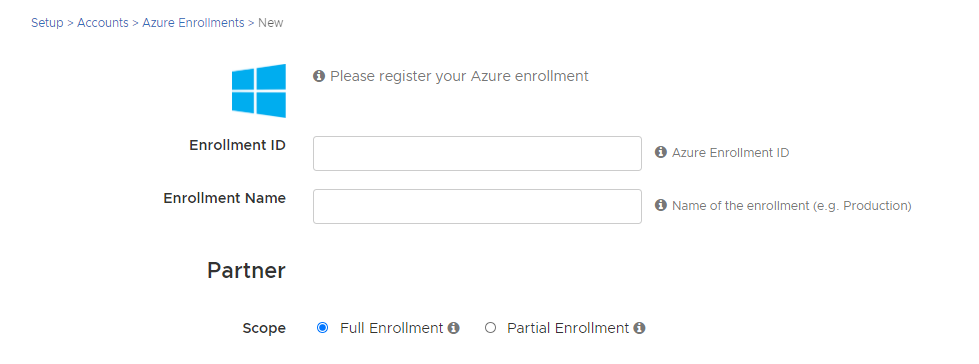
Configure Enrollment
-
Navigate to Setup > Accounts > Azure Enrollment and click Add Enrollment.
-
Enter the Enrollment ID and Enrollment Name.
-
Under Partner > Scope, select:
- Full Enrollment: To pull in all costs for the entire EA.
- Partial Enrollment: To pull in only costs for subscriptions assigned to the tenant.

Create and Configure Customer Tenant
-
Navigate to Partner > Customers > Lists. Then click New Customer.
-
In the New Customer Sign Up form, enter Account Information, Company Information, and Company Address for the customer.
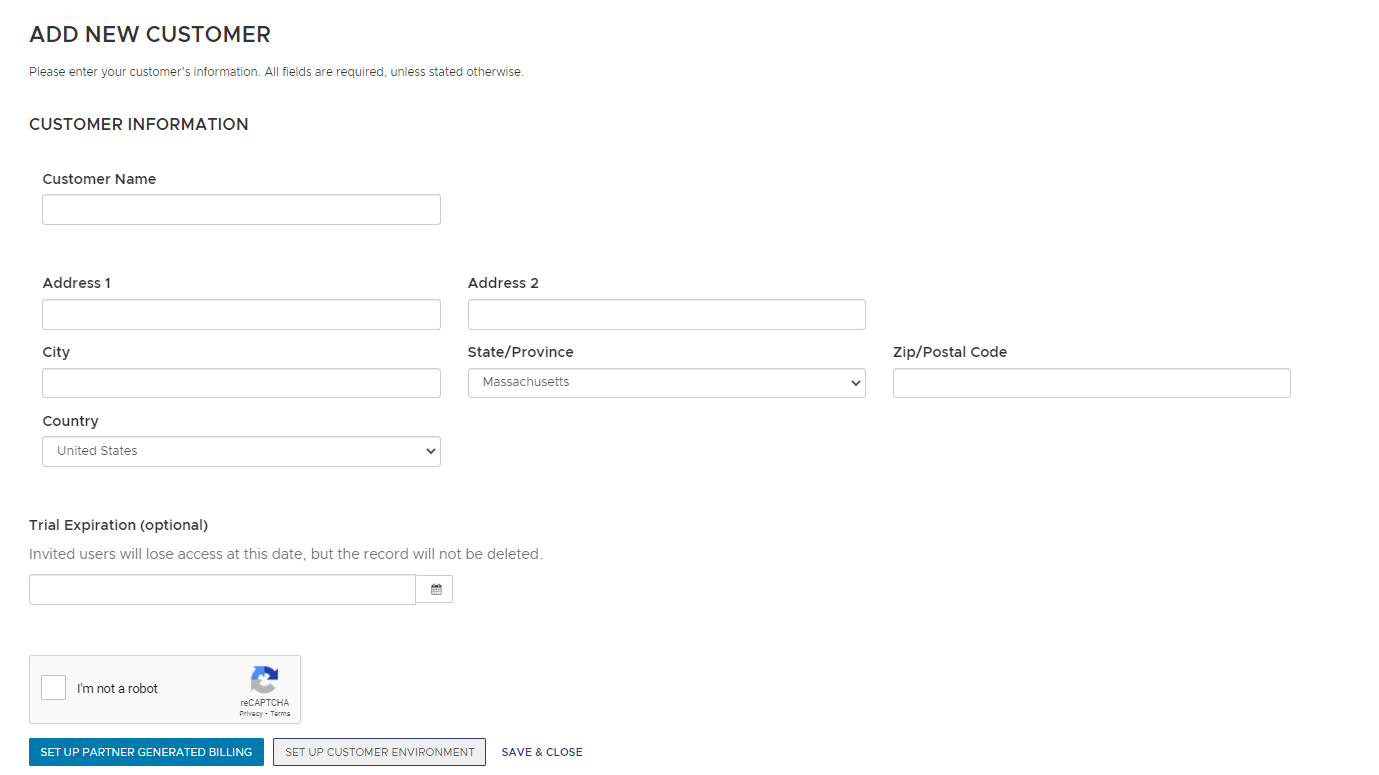
-
Select Set Up Partner Generated Billing to proceed.
-
Select a Classification to determine the level of customer access:
- Managed: A partner-managed customer who has a CloudHealth environment established, but the customer does not have login credentials to the CloudHealth console. These partner-managed customers may see reports from CloudHealth as shared by the Partner, or perhaps have billing data generated by CloudHealth, but the partner-managed customer never sees the CloudHealth UI directly.
- Managed with Access: A partner-managed customer who has a direct login provided to the CloudHealth console. This customer has either partial or full access to the CloudHealth UI and has been provided with at least one set of login credentials by the partner.
-
Click on Azure CSP or Azure EA tab to configure Azure accounts.
- Azure CSP: To configure a CSP partner customer account.
- Azure EA: To configure an Enterprise Agreement where only a subset of subscriptions are being assigned to the customer tenant being configured.
-
Select the Charge PAYG pricing checkbox to use the Azure Pay As You Go rate cards for customer bills.
- If the account type is CSP, from the Available CSP Accounts list, select the customer accounts to assign to this customer. Click Add to move them over to the Selected CSP Accounts list.
- If the account type is EA, from the Available EA Subscriptions list, select EA subscriptions to assign to the customer. Click Add to move them over to the Selected EA Subscriptions list.


- Click Update. CloudHealth creates the customer tenant.
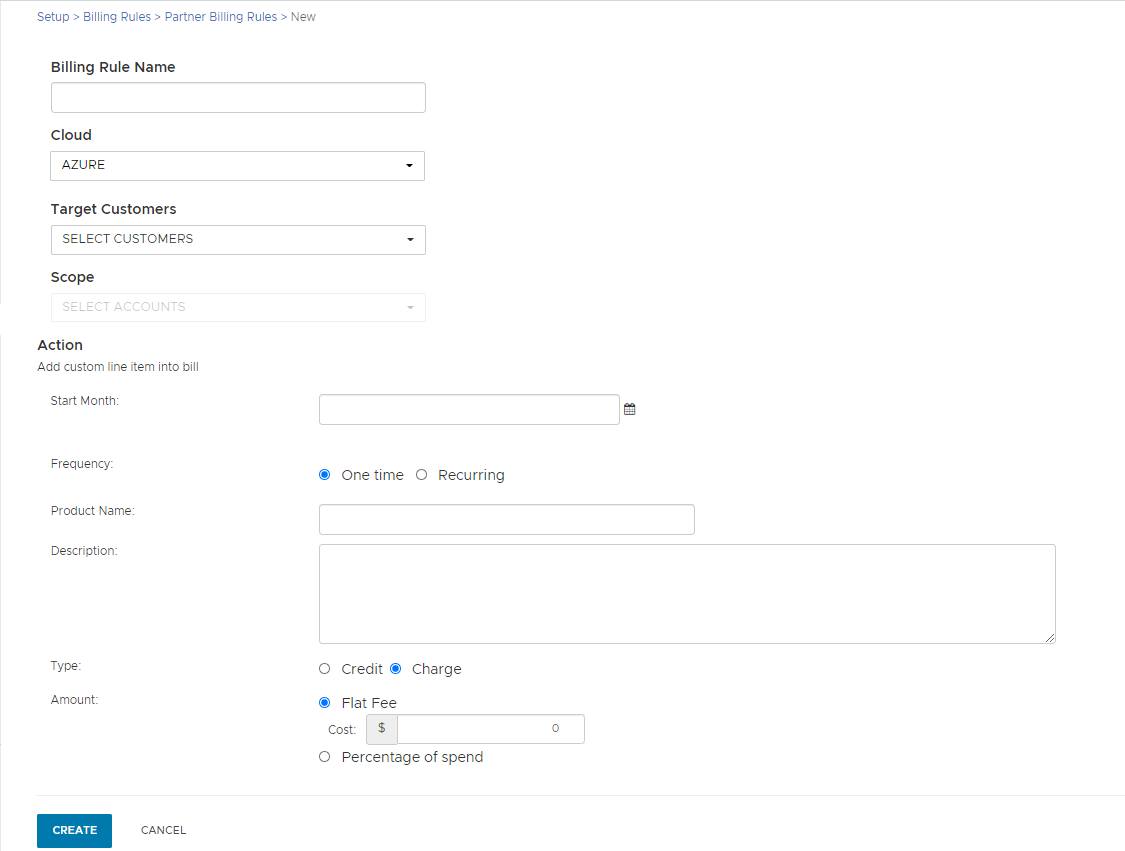
Bill Customers Using Microsoft EA Partner Billing Rules
- Log in to the CloudHealth platform as a partner. From the left menu, navigate to Partner > Partner Billing > Billing Rules and click New Partner Billing Rule.
- Enter Billing Rule Name and select Cloud and Target Customers from the drop-down list. You can create billing rules at per subscription basis.
Register CloudHealth App with Service Principal
Prerequisite: You must have global administrator privileges to register an App. While the connection between CloudHealth and Azure is read-only, a global administrator must register the App to ensure that there are no errors.
-
Open a text editor (such as NotePad or TextEdit).
-
Log in to the Azure Portal.
-
From the left menu, select Azure Active Directory.
-
Select the App Registrations tile and then click New App Registration from the top of the page.

-
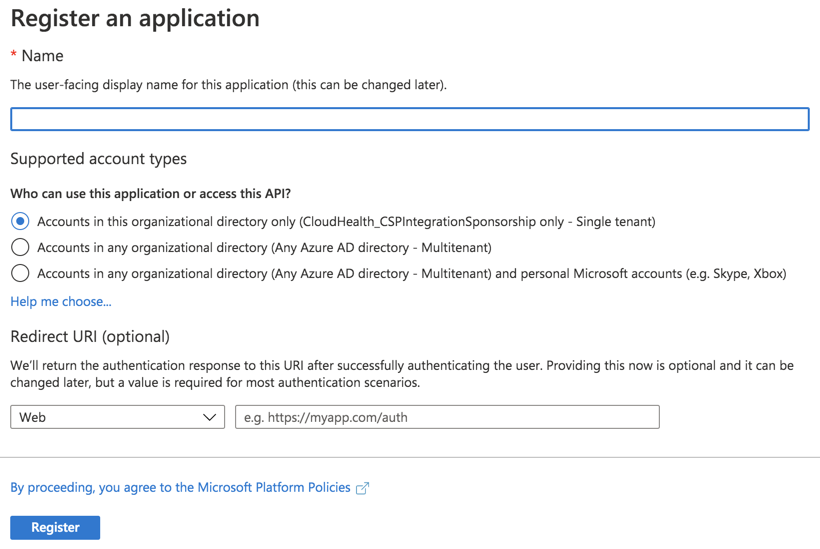
Fill out the following fields in the form and then click Create:
- Name: Enter the name of the service principal
- Supported Account Types: Select Accounts in this organizational directory only.
- Redirect URI: Select Web from the dropdown and enter
https://apps.cloudhealthtech.com
Due to a a rare issue in the Azure Portal, creating a new app registration might fail to create a new service principal as expected. If this occurs, click the Create Service Principal link in App Registrations > Overview.

-
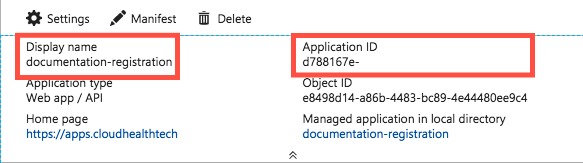
Open the Application Registration you just created.
- Copy the Display Name into the text document.
- Copy the Application ID into the text document.
-
Go to Certificates & Secrets in the left menu. Click New Client Secret.
- Add a key description. Make sure there are no spaces.
- Select a duration. It is recommended that you set the expiration to at least one year.
-
Click Save. A value is generated.
-
Copy the key description and value into the text document.
-
Close the App Registration blade and return to the Active Directory menu.
-
Under the Manage header, select Properties.
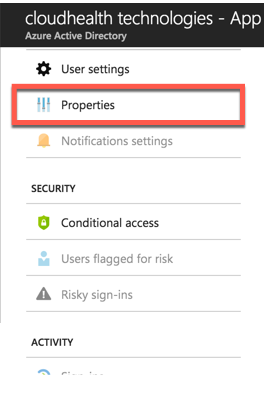
-
Locate the directory ID. Select the Copy icon to copy the ID and then paste it into the text document.

-
Repeat steps 3-12 for each directory you manage.
Checkpoint: At this point, you have this information in the text document.
- Display Name
- Application ID
- Key Description
- Key Value
- Directory ID/Tenant ID
Assign an Enrollment Reader Role to the Service Principal
You can only create or update this billing role using the API.
-
Use your account credentials as an Enterprise Admin or Global Admin to sign in to the tenant with the enrollment access that you want to assign.
-
Open the Role Assignments - Put REST API article. Click Try it.
-
Provide the following parameters as a part of the API request.
- Object ID
- Azure Tenant ID
- BillingAccountID
- Role definition (already pre-filled with correct role ID).

For help locating these values, see Find API Parameters topic. For more information, see Find your SPN and tenant ID.
- Update the following API request body with required details and run the API.
API Request Body:
{
   "properties": {
     "principalId": "REPLACE WITH OBJECT ID",
     "principalTenantId": "REPLACE WITH TENANT ID",
     "roleDefinitionId": "/providers/Microsoft.Billing/billingAccounts/REPLACE WITH BillingAccountID/billingRoleDefinitions/24f8edb6-1668-4659-b5e2-40bb5f3a7d7e"
   }
 }
- Generate the GUID billingRoleAssignmentName. Generate a unique GUID using either the New-Guid PowerShell command or using the Online GUID / UUID Generator website. Note down the GUID for later use.
- Repeat steps 1 to 6 for other Service Principals.
Mapping Multiple Enrollments to the Same Service Principal
If you have multiple enrollments mapped to the same service principals, you will need to run the Role Assignments - Put - REST API (Azure Billing) command for each enrollment.
-
Open the Role Assignments - Put REST API article, and click Try it.
-
Sign in to the tenant as an Enterprise Admin with the enrollment access.
-
Provide the following parameters as a part of the API request.
- Object ID
- Azure Tenant ID
- Enrollment Id
- Role definition (already pre-filled with correct role ID)
For help locating these values, see Find API Parameters topic. For more information, see Find your SPN and tenant ID.
- Update the following API request body with required details and run the API.
{
  “properties”: {
    “principalId”: “SPN ID OR OBJECT ID”,
    “principalTenantId”: “ADtenant ID OR Azure Tenant ID”,
    “roleDefinitionId”: “/providers/Microsoft.Billing/billingAccounts/EnrollmentID/billingRoleDefinitions/24f8edb6-1668-4659-b5e2-40bb5f3a7d7e”
  }
 }
Configuring GovCloud Subscriptions
When configuring the Service Principals with the enrollmentReader permission, change the API endpoint URL in the Role Assignments - Put API from https://management.azure.com to https://management.usgovcloudapi.net to grant the SPN the new permission.
Find API Parameters
Object ID
- In the CloudHealth platform, navigate to Setup > Accounts > Azure Enrollment. Click View the Enrollment you configured and verify the Service Principal ID.
- In the Azure portal, navigate to Azure Active Directory. From the left menu, select Enterprise applications.
- Select Service Principal you configured with CloudHealth, and copy the Object ID.
Make sure that you copy and paste the Object ID from Enterprise applications. Do not use Object ID from App Registrations.

Azure Tenant ID
- In the Azure portal, go to Azure Active Directory.
- Copy the Tenant ID from the Overview tab.

BillingAccountID
- In the Azure portal, go to Cost Management + Billing.
- From the Overview section, copy the Billing Account ID.

Role Definition
Already pre-filled with correct role ID. For example- "roleDefinitionId": "/providers/Microsoft.Billing/billingAccounts/REPLACE WITH BillingAccountID/billingRoleDefinitions/24f8edb6-1668-4659-b5e2-40bb5f3a7d7e"
Enrollment ID
- In the CloudHealth platform, navigate to Setup > Accounts > Azure Enrollment.
- Click the view icon to see the enrollment you configured and copy the Enrollment ID.
Add Reader Role for Subscriptions
Assign a Reader role for subscriptions that are managed in the directory.
For help assigning roles in Azure, see Assign Azure Roles using the Azure Portal.
When assigning the role, make the following selections:
- Role: Reader
- Members: CloudHealth
Repeat this step for each subscription.
Add Permissions to Access Key Vault (Optional)
With the additional get and list permissions, CloudHealth gets access to keys and secrets for each key vault under each subscription. Providing this access offers the following benefits:
- Visibility: Get all keys & secret details under each key vault in Asset reports.
- Policies: Create policies on keys and secrets and get notified if any key/secret doesn’t have an expiry date set.
- Perspectives: Since Key Vault Keys & Secrets are taggable assets, you can create perspective groups based on tags.
Use the following steps to grant additional permissions to the service principal:
- Log in to the Azure Portal, and click the Cloud Shell icon on the top navigation bar.

- Enter the following PowerShell script for every active Service Principal that you have added in the CloudHealth platform.
$subs = Get-AzureRmSubscription
$client_id = 'Application id of service principal'
foreach ($sub in $subs) {Set-AzureRmContext -SubscriptionId $sub.SubscriptionId
$key_vaults = Get-AzureRmKeyVault
foreach ($key_vault in $key_vaults) {Set-AzureRmKeyVaultAccessPolicy -VaultName $key_vault.VaultName -ServicePrincipalName $client_id -PermissionsToKeys get,list -PermissionsToSecrets get,list } }
Get the Application id of the service principal from the CloudHealth platform. Go to Setup > Accounts > Azure Service Principal.
The script accesses current key vaults and grant permission to the service principal to retrieve and display key vault keys and secrets.
For a newly-added key vault, you need to separately grant permission to the service principal to retrieve and display keys. You can either run the above PowerShell script or manually add the service principal using following steps:
- In the Azure Portal, go to the newly added key vault.
- From the Settings menu, navigate to Access Policies, and click Add Access Policy.
- Select
get,listpermissions from the Key permissions and Secret permissions dropdown. - Select Service principal.
- Click Add.
Connect Service Principal in CloudHealth
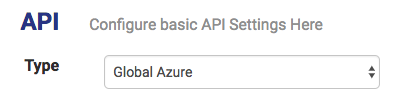
-
Log in to the CloudHealth platform. From the left menu, select Setup > Accounts > Azure Service Principal. Then click New Service Principal.
-
Select Global Azure from the Account Type dropdown.
-
Copy the information from the text document into corresponding fields in the setup form.
Make sure there are no spaces.
-
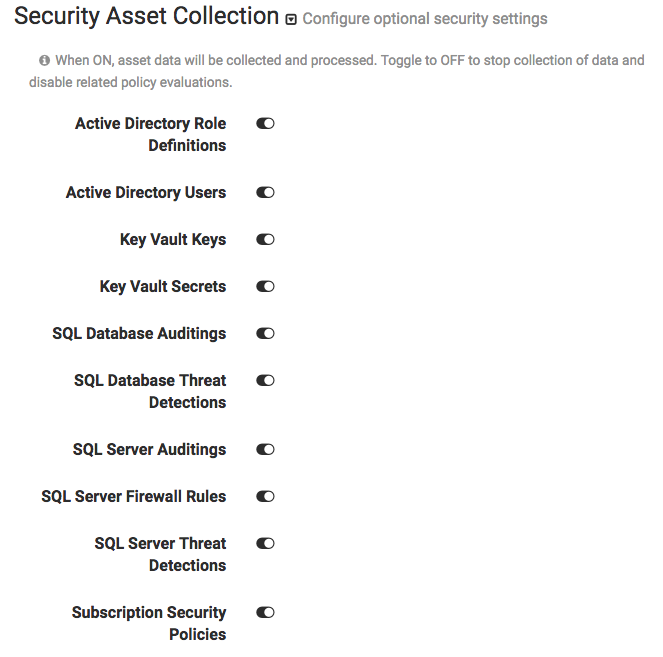
Optionally, select the Security Asset Collection dropdown if you want to disable asset collection on certain assets for security reasons. CloudHealth recommends enabling asset collection for all assets and does not store sensitive data.
Disabled assets are marked as inactive in CloudHealth and cannot be used in policies.
-
Click Save Service Principal.
Assign a Reader Role to Azure Savings Plans
-
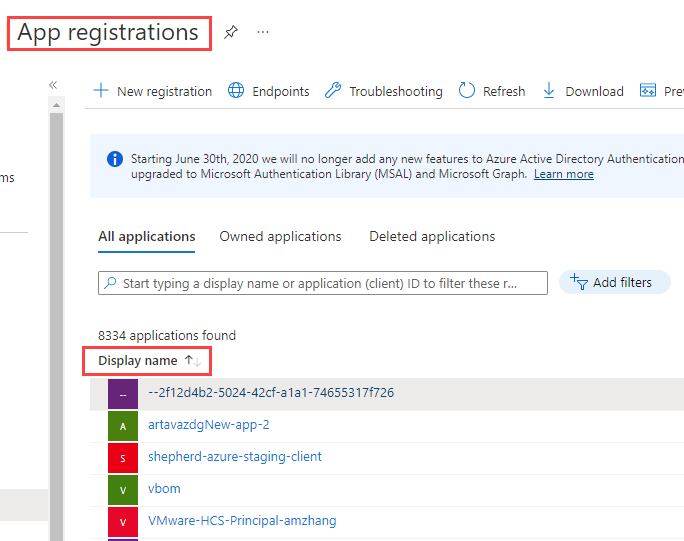
Log in to the Azure Portal and go to Azure Active Directory > App Registrations.
-
Copy the display name of the application you registered for CloudHealth and paste it in a Text file (such as NotePad or TextEdit).
-
Log in to the CloudHealth Platform. Go to Assets > Azure and select Savings Plans from the Other section.
-
In the Savings Plan table, click the Go to Azure Portal icon to open the savings plan in the Azure portal.
-
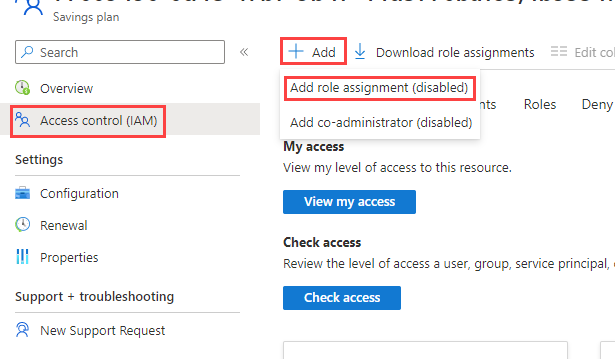
From the left pane, go to Access Control (IAM) and click Add role assignment.
- Fill out the fields as follows:
- Select Reader from the Role dropdown menu.
- In the Select field, copy and paste the service principal display name from step 2 that is associated with the savings plan and select the user returned by the search.
-
Click Save.
-
Repeat steps 4-7 for each Savings Plan.
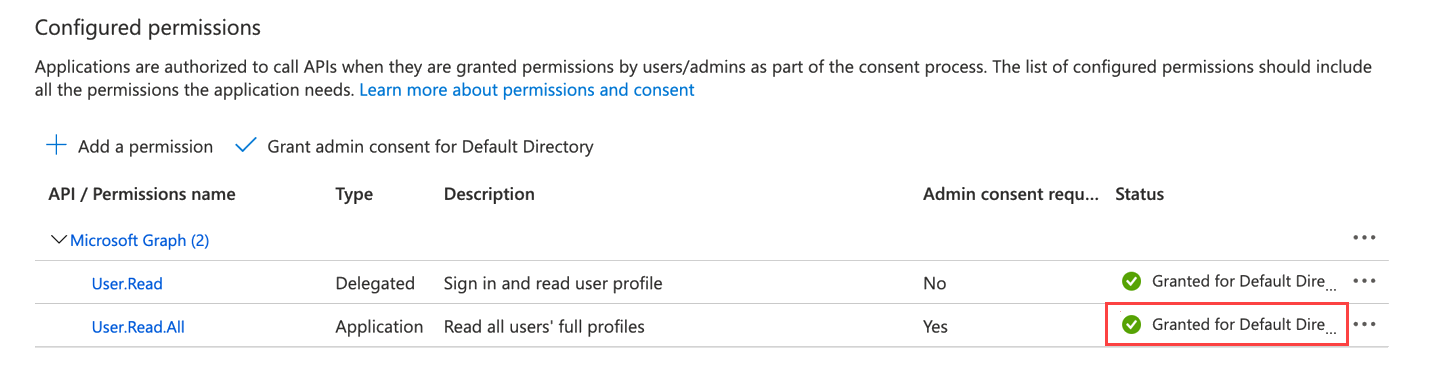
Configure Application Permission for Azure AD User Collection (Optional)
The CloudHealth platform supports Azure AD User collection through Azure Service Principal. To collect the Azure AD objects, you need to add an additional Graph API permission to the Service Principal.
-
Log in to the Azure Portal, go to Azure Active Directory > App Registrations, and select the CloudHealth app.
-
Click API permissions > Add a permission.
-
Select Microsoft Graph and click Application permissions.
-
Under Select Permissions, expand Users, and select
User.Read.All permission. -
Click Add Permissions.
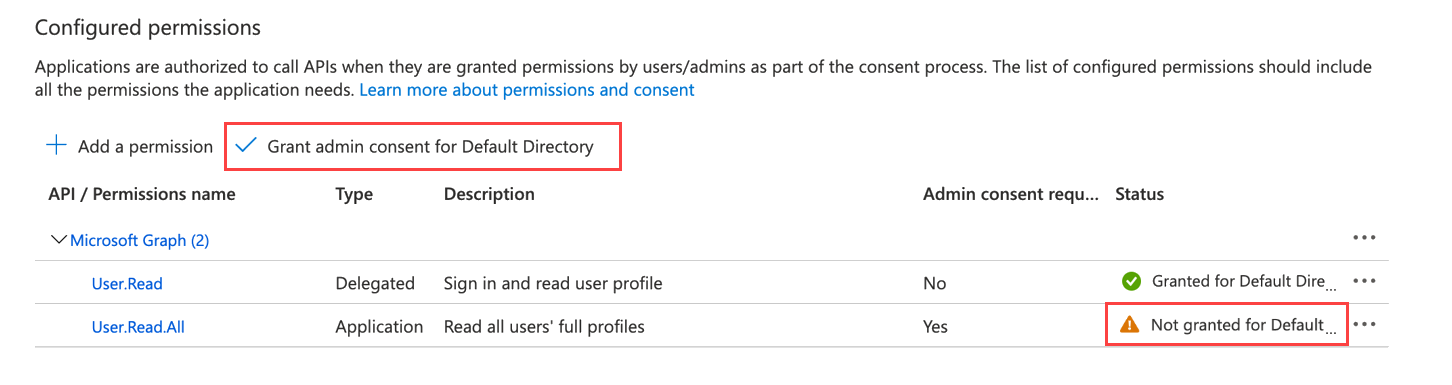
Once you add the required permissions, click Grant admin consent for Default Directory to allow an admin to grant admin consent to the configured permissions.