topics
An account not linked to a consolidated billing account, which receives its own statement.
Enable Billing Bucket for Amazon Account
A billing bucket is essential for providing the CloudHealth platform access to detailed cost and usage information from your accounts. Create and enable a billing bucket for each account.
Best Practice: Create a new bucket for holding Amazon billing reports instead of reusing an existing bucket. In addition, the bucket must be unique within the region you select later, so choose a non-obvious name.
Create S3 Bucket
- Login to the AWS Console as an administrator.
- Click your profile name at the top right corner and select Account from the dropdown.
- From the left menu, click Billing Preferences.
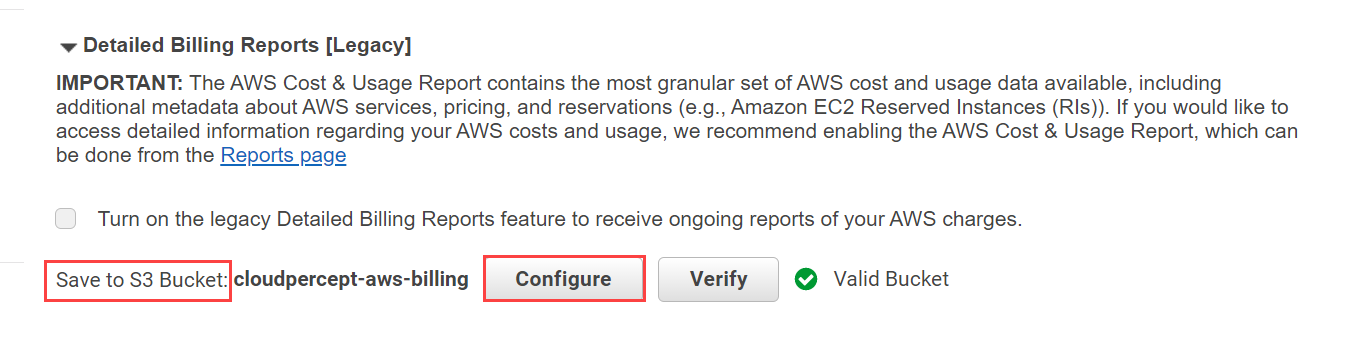
- Expand the Detailed Billing Reports [Legacy] dropdown and click Configure to set up an S3 bucket to receive billing reports.
-
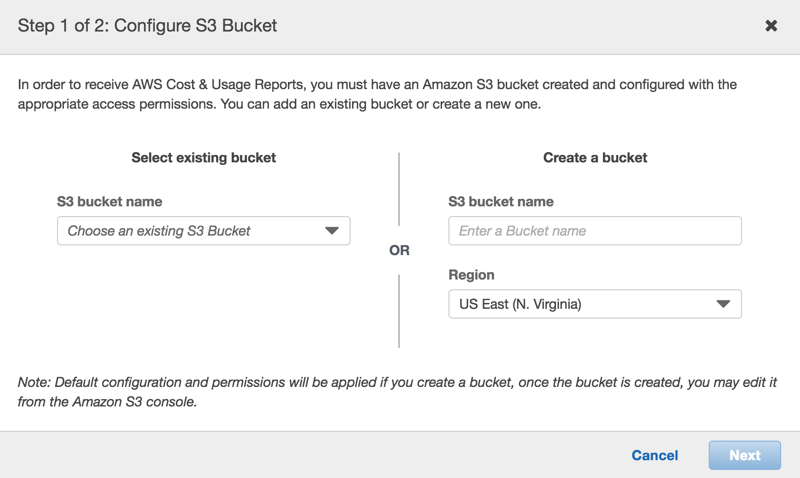
In the S3 configuration dialog box create a new bucket.
-
Enter a unique Bucket Name and Region.
-
On the next page, review the policy that is generated for the bucket and click Save.
Copy the name of the S3 billing bucket to the clipboard as displayed in the Save to S3 Bucket field.
Set Up Usage and Billing Reports
Skip this step if you have migrated from DBR (Detailed Billing report) to CUR(Cost and Usage report).
- After creating the S3 bucket, in the Report table, select the check boxes for the required reports.
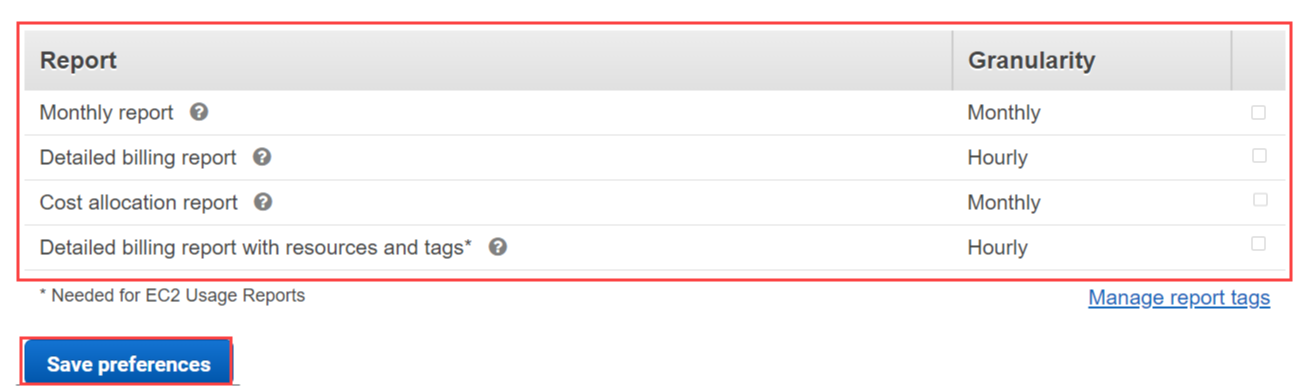
- Click Save Preferences.
Enable Cost and Usage Report
Create CUR in AWS Console
AWS Cost and Usage Reports (CUR) provide comprehensive data about your costs, including those related to product, pricing, and usage. For more information, see AWS Cost and Usage Reports.
In order to take advantage of these new features, configure your AWS account to create a CUR and make it available for consumption by the CloudHealth platform.
-
In the AWS Console navigate to your profile name and click Account.
-
From the left menu, select Cost & Usage Reports and click Create report.
-
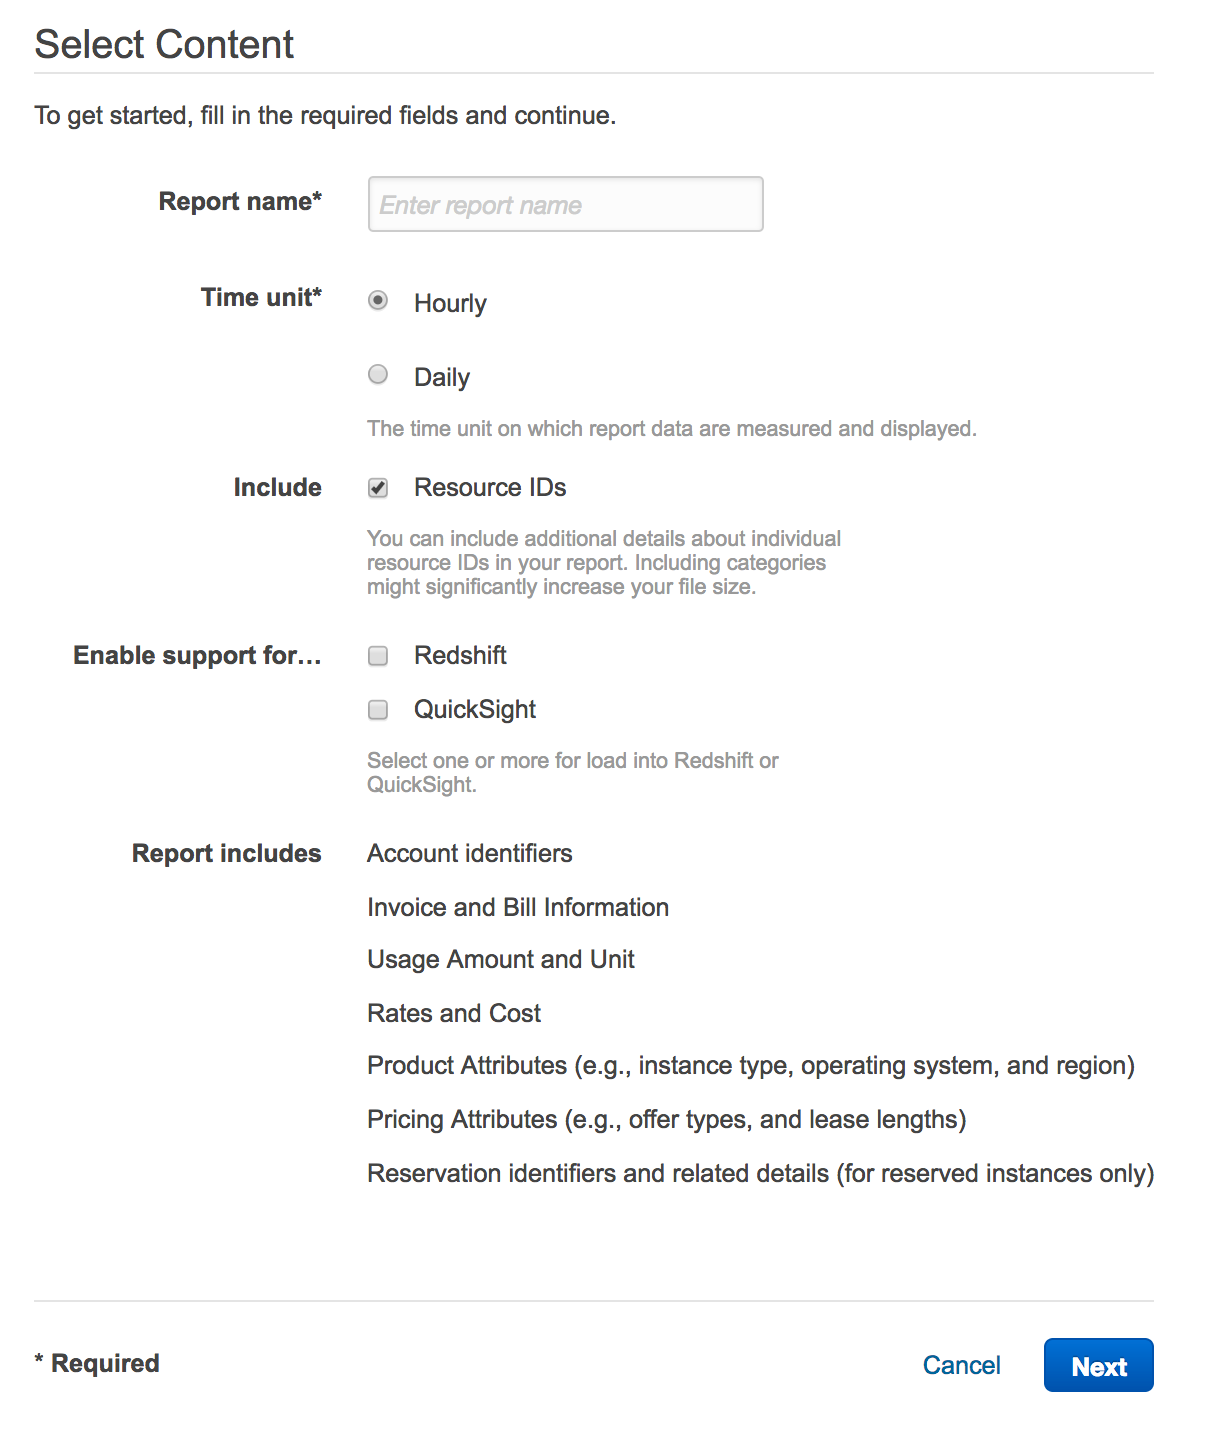
Navigate the configuration wizard, ensuring that you make the following entries and selections.
- Report Name: Use an easily identifiable name, for example,
cloudhealth-hourly-cur. - Check the box next to Include Resource ID.
- Check the box next to Automatically refresh your Cost & Usage Report when charges are detected for previous months with closed bills.
- S3 Bucket: Enter the name of the S3 bucket you created above.
- Report path prefix: Enter a unique prefix.
- Time granularity: Select Hourly.
- Report versioning: Select Create new report version.
- Compression: Select GZIP.
- Report Name: Use an easily identifiable name, for example,
-
Click Review and Complete.
Configure Cost Allocation Tags
CloudHealth extracts the tags and resource IDs from your billing artifact and automatically allocates costs for your taggable AWS services. To support the derivation of asset and tag data from the CUR, you must configure the AWS Account to include Cost Allocation Tags in the CUR artifacts.
CloudHealth recommends adding each tag key you use for perspective grouping as a Cost Allocation Tag. For more information, see Using Cost Allocation Tags
- In the AWS Console, navigate to the AWS Billing dashboard.
- From the left menu, choose Cost Allocation Tags.
- Select the tags that you want to activate.
- Click Activate.
It can take up to 24 hours for activation of the selected tags.
Enable the CUR in CloudHealth
-
In the CloudHealth platform, from the menu, select Setup > Accounts > AWS and edit the AWS account for which the CUR should be enabled.
Enable the CUR only for Consolidated or Standalone accounts.
-
In the Cost and Usage Report section, enter the following information.
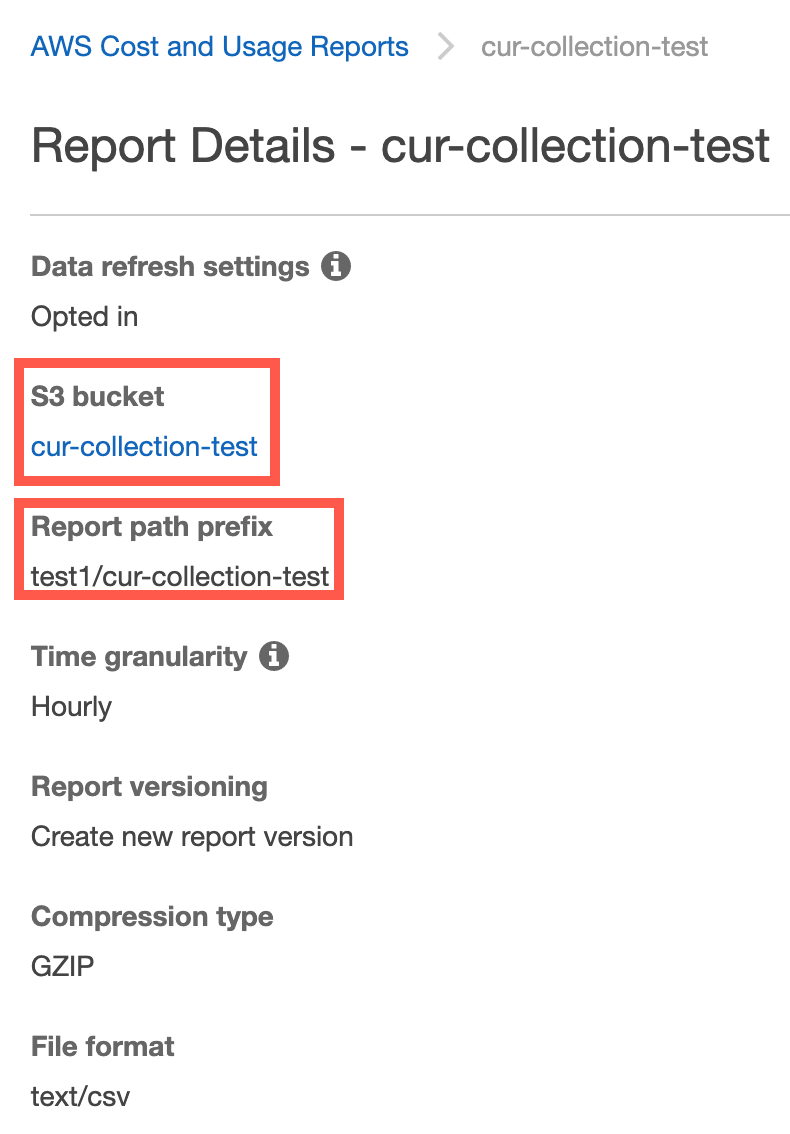
- Bucket Name: Name of S3 bucket that stores the hourly CUR data.
- Report Path: The path to the CUR, and the name of the CUR, separated by a slash.

CloudHealth uses the information you provide in these fields to access your CUR. Inaccuracies in these values can cause errors when CloudHealth attempts to access the reports.
To locate accurate values for these fields, navigate to the Billing & Cost Management Dashboard in the AWS Console. From the left menu, select Cost & Usage Reports. Click the name of the report to view the bucket name and report path.
-
Update the policy associated with the IAM role for this account to grant permission to access and read the CUR. Click Generate Policy to produce a new IAM policy.
If the policy is not updated, CloudHealth will be unable to access the bucket and read the CUR reports stored inside it.
-
In the IAM Access Policy dialog box, click Select All and copy the contents to the clipboard.
-
Switch to the AWS Console and navigate to Services > Security, Identity & Compliance > IAM. From the left menu, select Policies and locate the IAM Access Policy you are using for the CloudHealth platform.
-
In the Permissions tab, click JSON and click Edit policy.
-
Paste the policy you copied from the CloudHealth platform into the editor, and Save the policy.
-
In the CloudHealth platform, return to the AWS account you were editing and click Save Account.


Set Up Read-Only IAM Role
You can set up the IAM permissions through one of the following configurations:
Option 1: Create IAM Permissions via CloudFormation
Download and Modify CloudFormation Templates
-
Download the following CloudFormation templates:
-
Optionally, edit each template to modify the permissions as needed for your customers.
-
Save each template with unique names.
Upload CloudFormation Templates to S3 Buckets
-
In the AWS Console, go to Services > Storage > S3. You can either:
- Create a new bucket for CloudFormation templates by selecting Create Bucket (recommended). For more information on how to create an S3 bucket, see Creating a bucket.
- Open an existing bucket.
-
Click the bucket name, and select Upload.
-
Click Add files and add the saved CloudFormation templates.
-
Expand the Permissions section, and select the Grant public read access option.
-
Expand the Properties section and configure the storage properties.
-
Click Upload.
Create a New Stack in CloudFormation
This section is typically performed by the customer account administrator.
- In the CloudHealth Platform, go to Setup > Accounts > AWS and open the AWS account you created in the previous step. Copy the uniquely generated External ID into a text document.
- In the AWS Console, go to Services > Storage > S3.
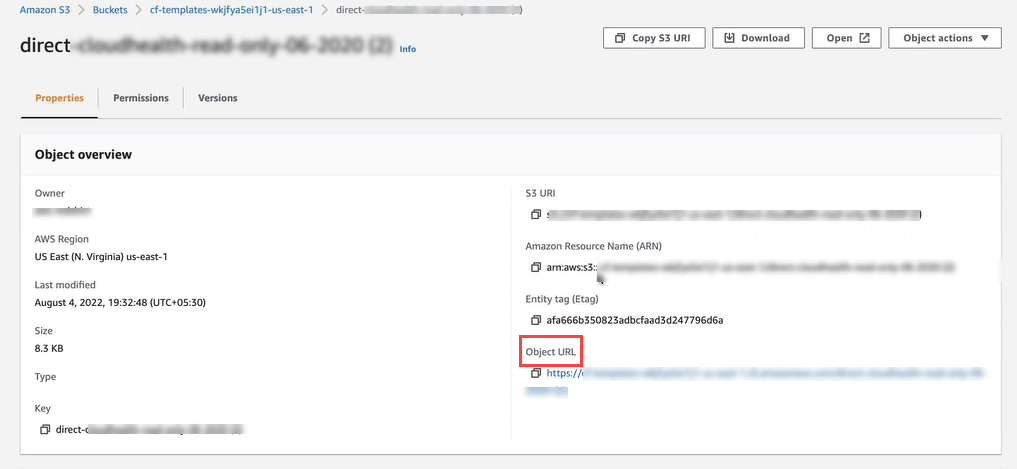
- Open the S3 bucket where you have uploaded the CloudFormation templates and select the appropriate CloudFormation template for the customer's AWS account.
- From Properties > Object Overview, copy the Object URL link.
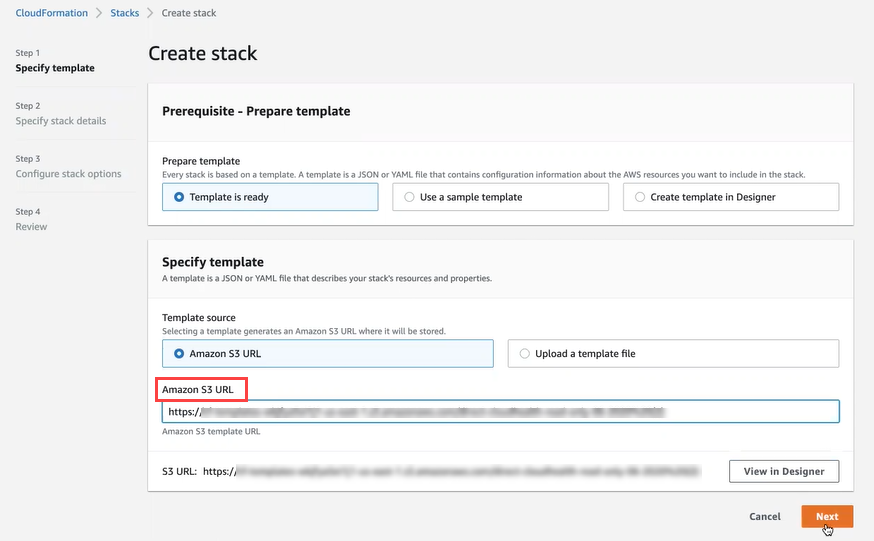
- Go to Services > Management & Governance > CloudFormation and select Create Stack - With new resources (standard).
- In the Amazon S3 URL field, enter the Object URL link you copied in step 4.
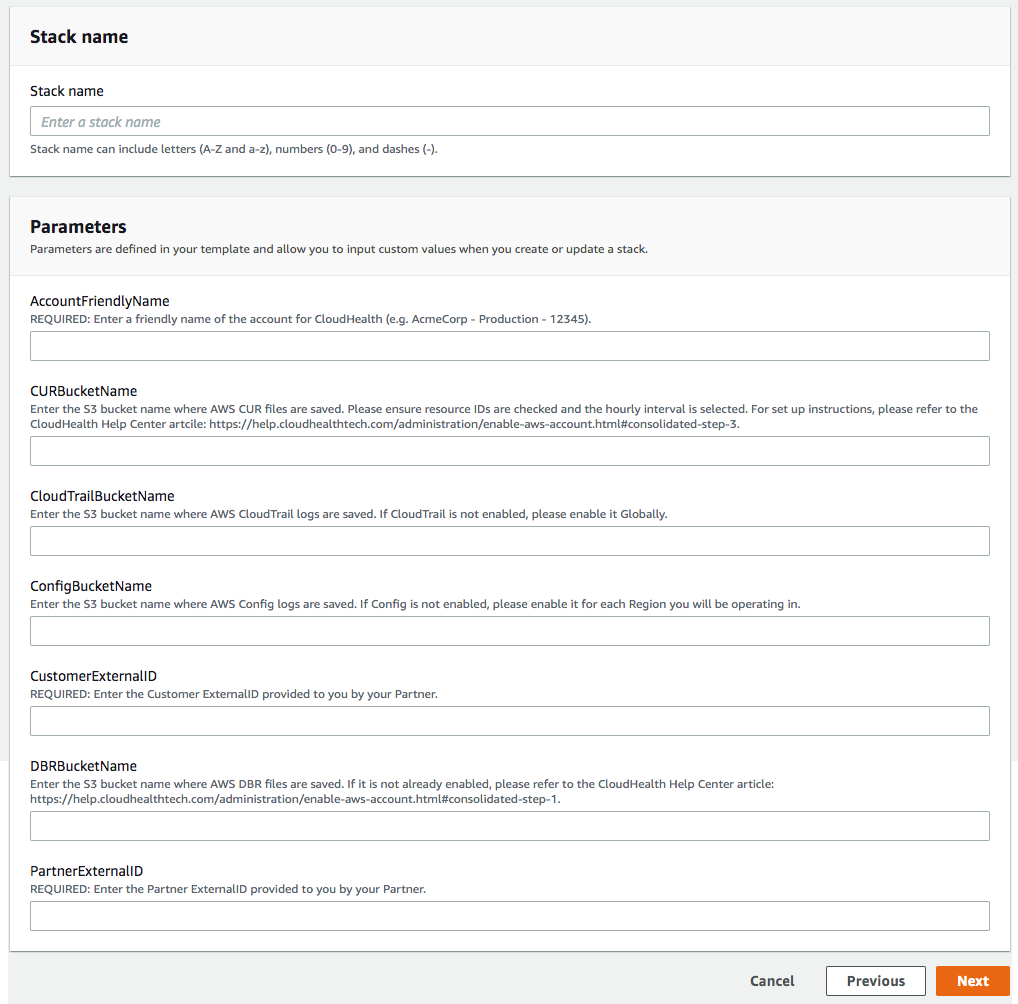
 7. On the next page, enter a unique Stack Name.
8. In the Parameters section, enter the following details
- CURBucketName- the S3 bucket name you created in previous step .
- CustomerExternalID- the external ID you copied in step 1.
7. On the next page, enter a unique Stack Name.
8. In the Parameters section, enter the following details
- CURBucketName- the S3 bucket name you created in previous step .
- CustomerExternalID- the external ID you copied in step 1.
- Optionally, configure tags and rollback triggers. Click Next.
- Click Create Stack.
- Verify that the newly created stack reaches a status of
Create_Complete. This process should take less than a minute. - Open the newly created stack, and from the Outputs tab, copy the RoleARN number into a text document.
Update CloudHealth Account
- In the CloudHealth Platform, return to the AWS account you copied the external ID from (Setup > Accounts > AWS).
- Enter the Role ARN you copied from the CloudFormation stack.
-
If you are using the Automated CloudFormation template, select the Automation dropdown to open the list of automation permissions. For each service you included as automated in your saved copy of the template, switch the permission to On.
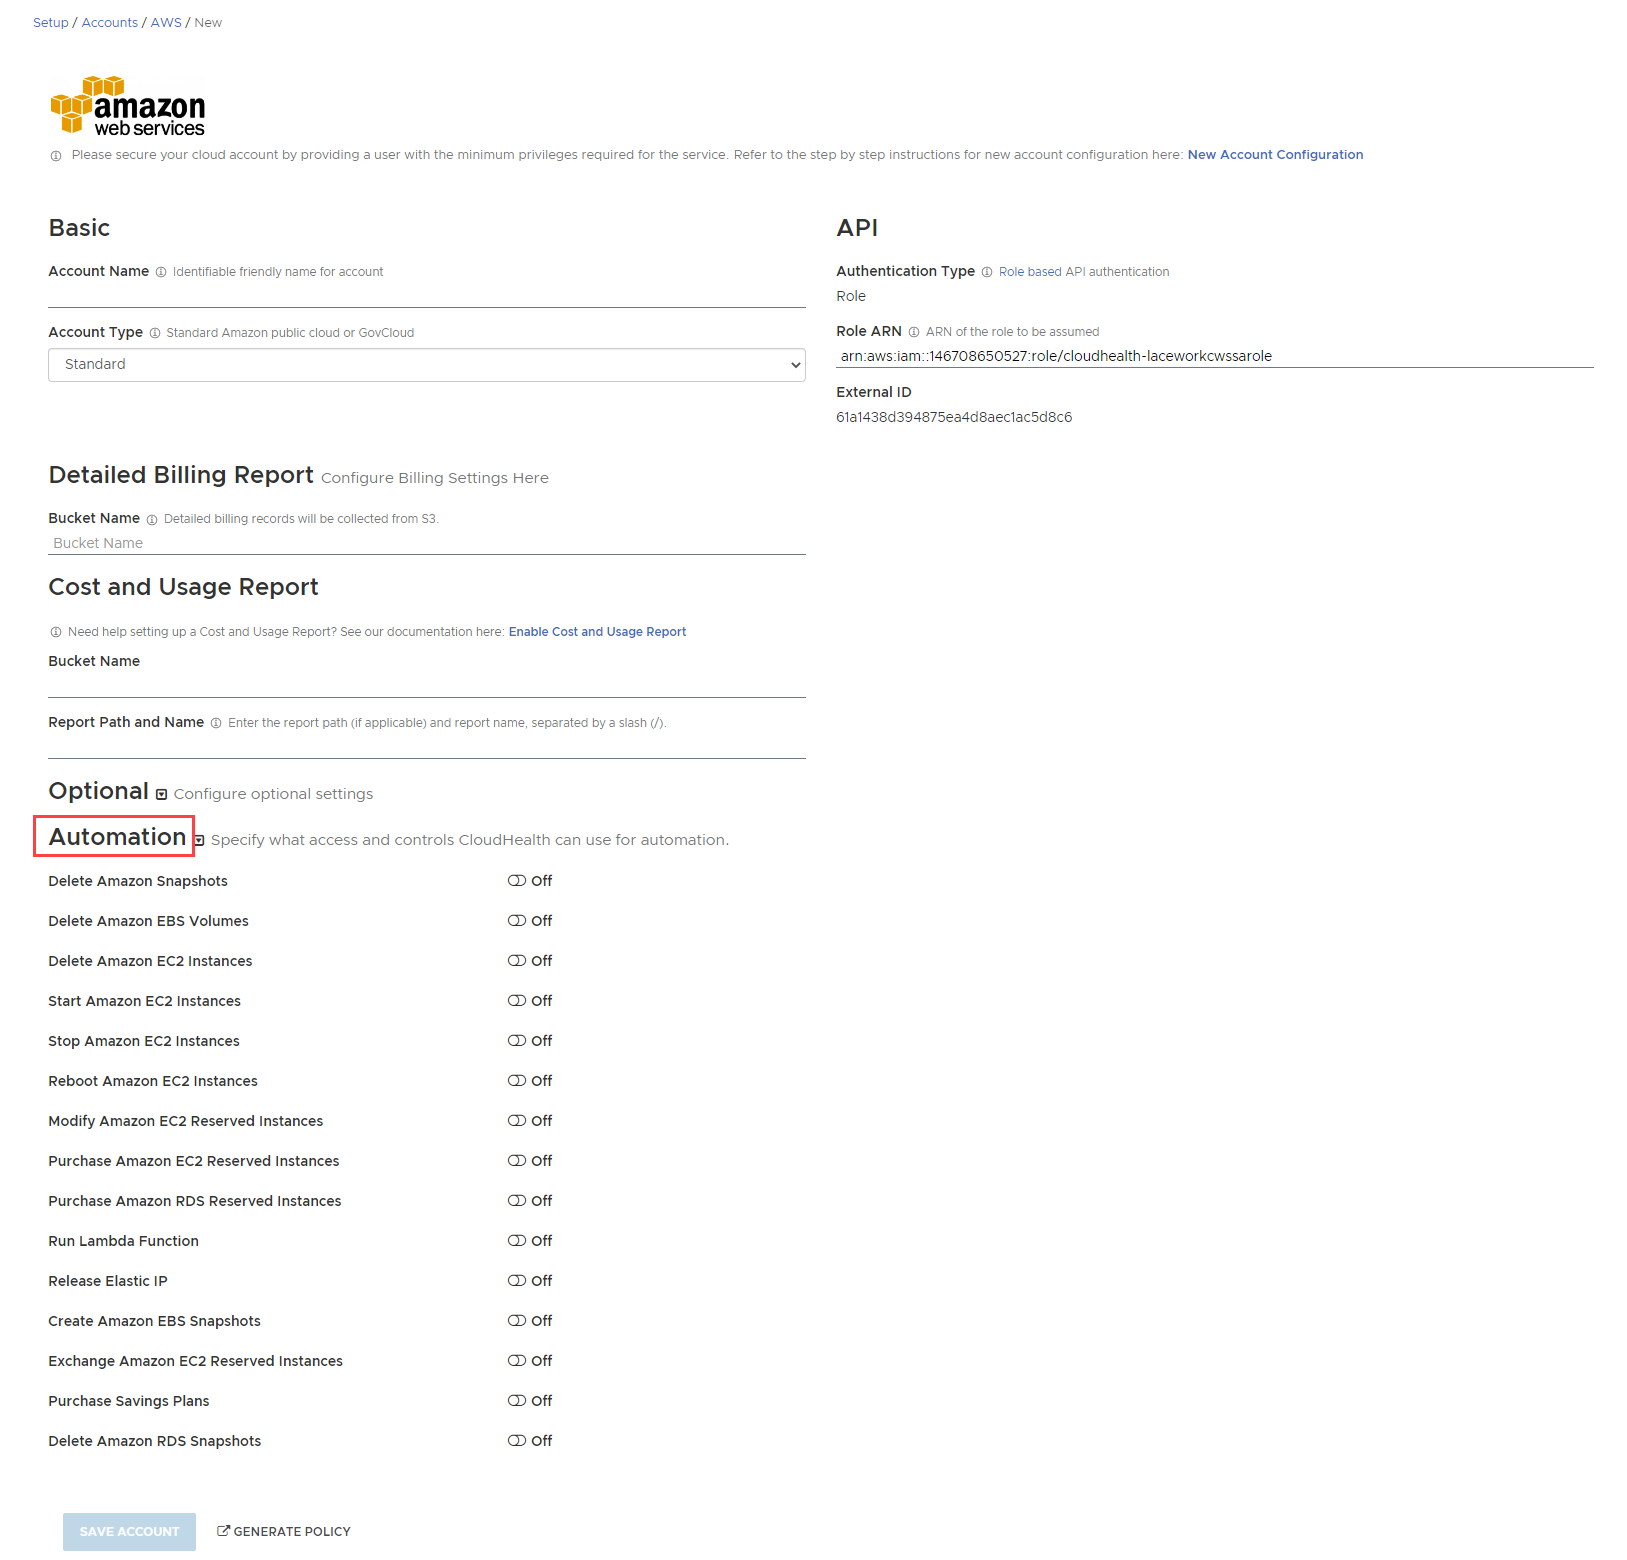
If you do not manually switch on a service's permission, CloudHealth won't be able to automate that service even if you included that service in the Automated CloudFormation template.
-
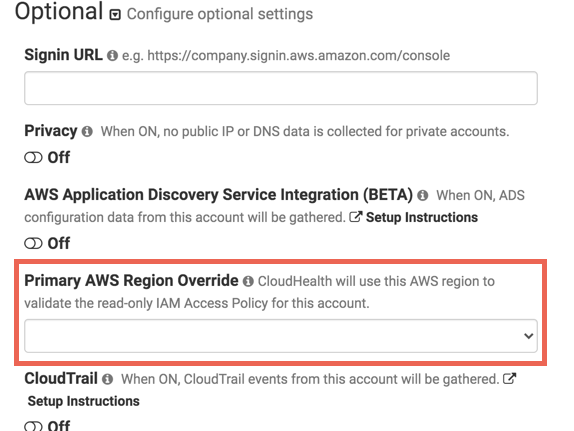
By default, CloudHealth validates the read-only IAM policy with the us-east-1 AWS region. If you do not have access to the us-east-1 region, you must select a different region for validation. Under Optional, select the desired region from the Primary AWS Region Override dropdown.

- Click Save Account.
Option 2: Create IAM Permissions via IAM Role
Create a read-only IAM role within the AWS Console for the target account. Then add these credentials to the CloudHealth platform.
The default AWS Read-Only policy provides read access to data, such as S3 objects, and is therefore discouraged from being used.
- Log in to the AWS Console for the targeted account as a user who has permission to create an IAM role.
- Navigate to Services > Security, Identity, & Compliance > IAM. From the left menu, select Policies and click Create Policy.
- Switch to the JSON tab.
- In a separate browser window, log in to the CloudHealth platform. From the menu, select Setup > Accounts > AWS and open the AWS account you created previously.
- Enter the name of the billing bucket you created and click Generate Policy. The bucket name is included in the resulting policy.
- The IAM Access Policy dialog box appears. Click Select All and copy the contents to the clipboard.
- Return to the AWS Console and paste the policy into the JSON tab. Then click Review Policy.
- Name the policy (e.g., CHTPolicy), provide a description, and click Create policy.
- In the AWS Console, from the left menu, select Roles and click Create role.
- On the Select trusted entity page, choose AWS account.
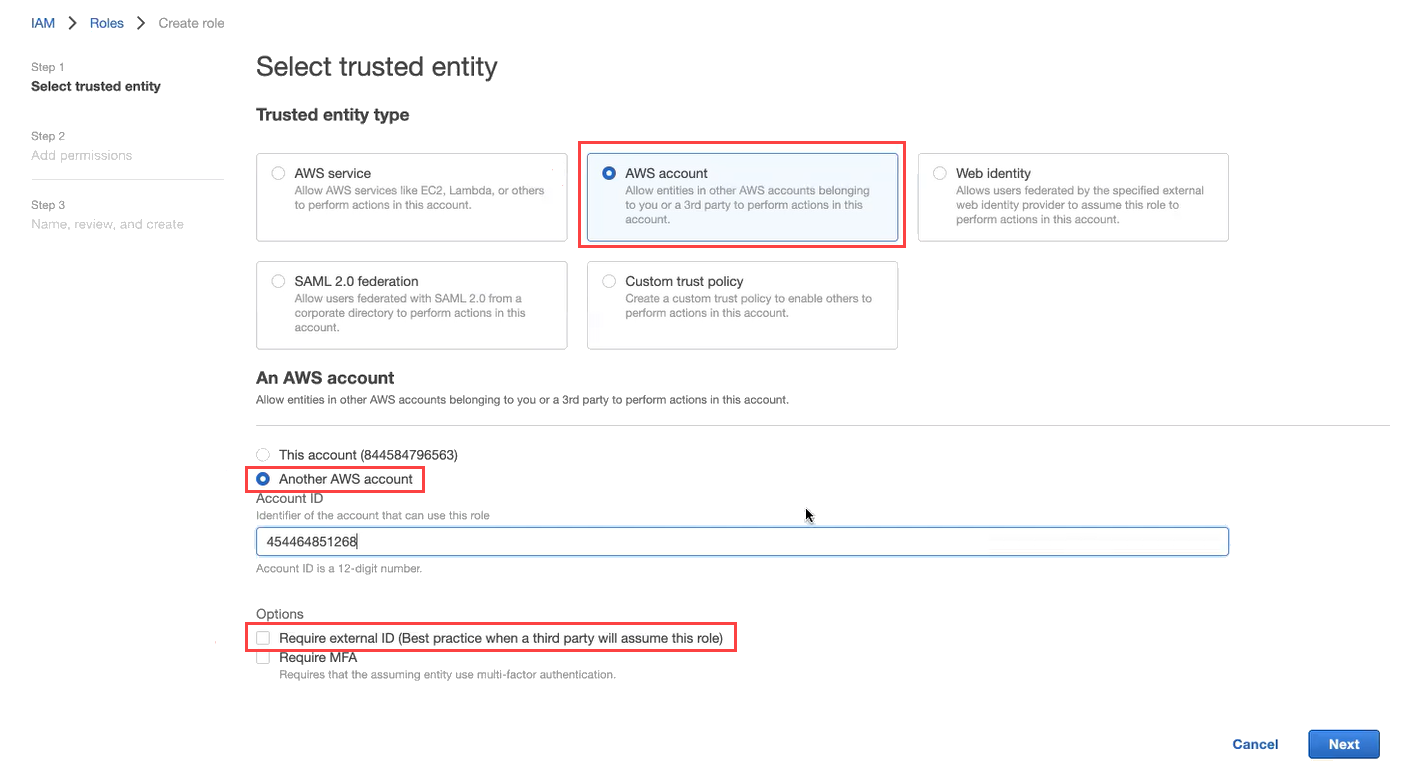
- Select Another AWS account. In the Account ID field, enter
454464851268, which is the ID of the secure CloudHealth-managed account. - Select the Require external ID Option. From the CloudHealth platform, copy the CloudHealth generated External ID from the account setup form. This ID is unique for each CloudHealth customer so that you can reuse it across all your accounts.
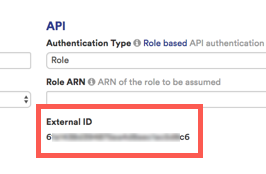
- Paste this copied ID in the External ID field in the AWS Console.
- Leave the checkbox for Require MFA cleared because the IAM role will be used to provide programmatic access to the CloudHealth platform. Click Next.
- On the Add Permissions page, set the filter to customer managed and choose the CloudHealth policy you created. Click Next.
- Enter a name and description for the role and click Create Role.
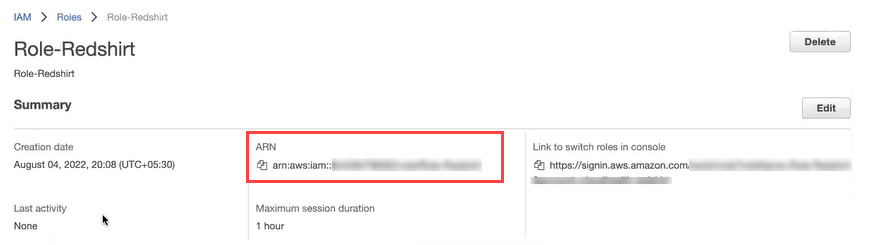
- From the IAM > Roles page, select the role you just created. Copy the value of RoleARN to the clipboard.
-
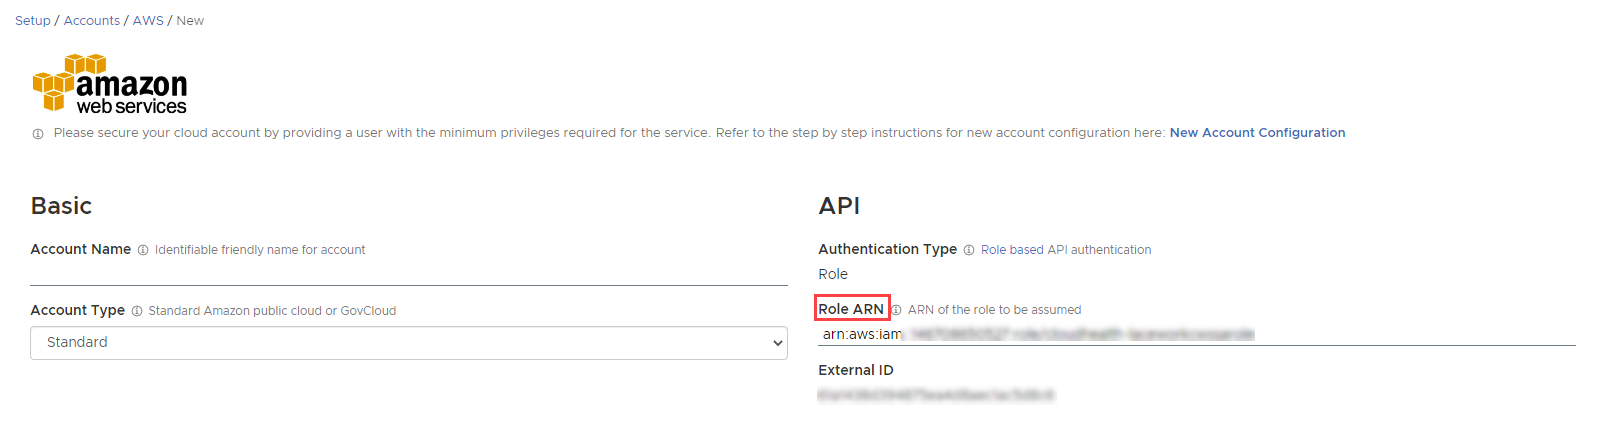
Return to the AWS Account Setup page in the CloudHealth platform. In the API section, paste the Role ARN value.
-
By default, CloudHealth validates the read-only IAM policy with the us-east-1 AWS region. If you do not have access to the us-east-1 region, you must select a different region for validation. Under Optional, select the desired region from the Primary AWS Region Override dropdown.
- Click Save Account.
CloudHealth validates your account and begins collecting data. If there are issues with any information you provided, an error message appears.
Enable AWS Console Integration (Optional)
In the CloudHealth platform, instances have links that allow you to view them in the AWS Console.
These links are set up by enabling AWS Console integration from the CloudHealth platform.
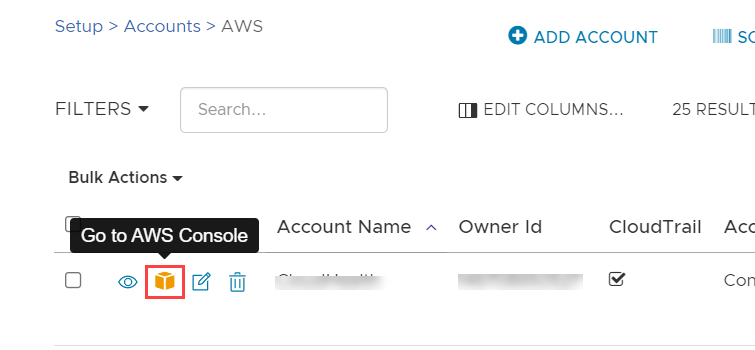
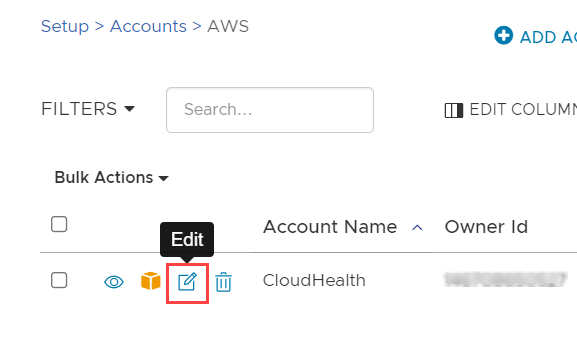
- In the CloudHealth platform, from the menu, select Setup > Accounts > AWS.
- From the list of AWS accounts, edit the account for which you want to add AWS Console integration.
- In a separate browser window, login to the AWS Console.
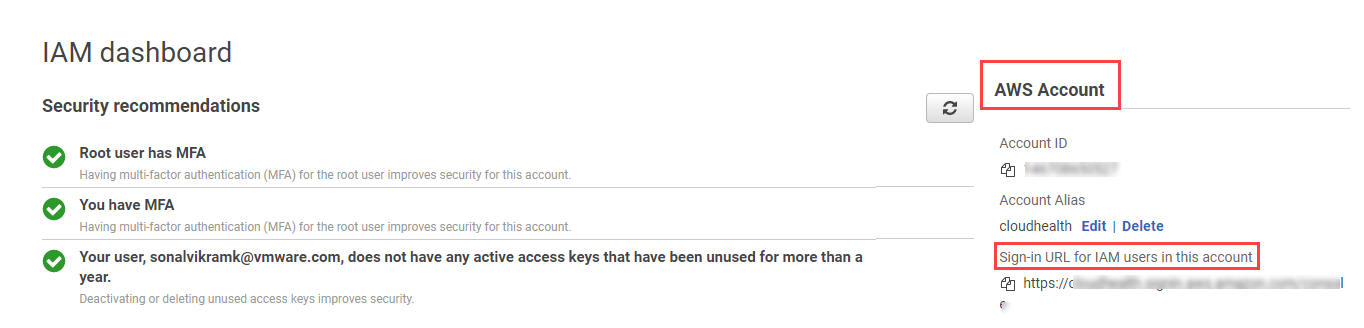
- From the menu, select Security, Identity, & Compliance > IAM.
- From IAM Dashboard > AWS Account, copy the IAM User Sign-In URL into the clipboard.
- Back in the CloudHealth platform, expand the Optional section of the account setup form. Paste the URL in the Signin URL field.
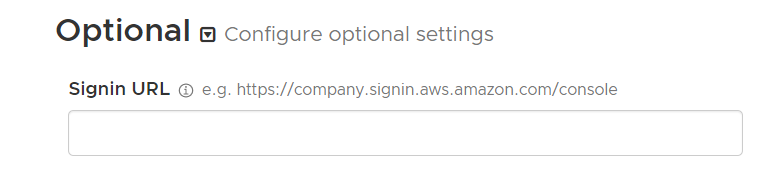
- Click Save Account to enable AWS Console integration.
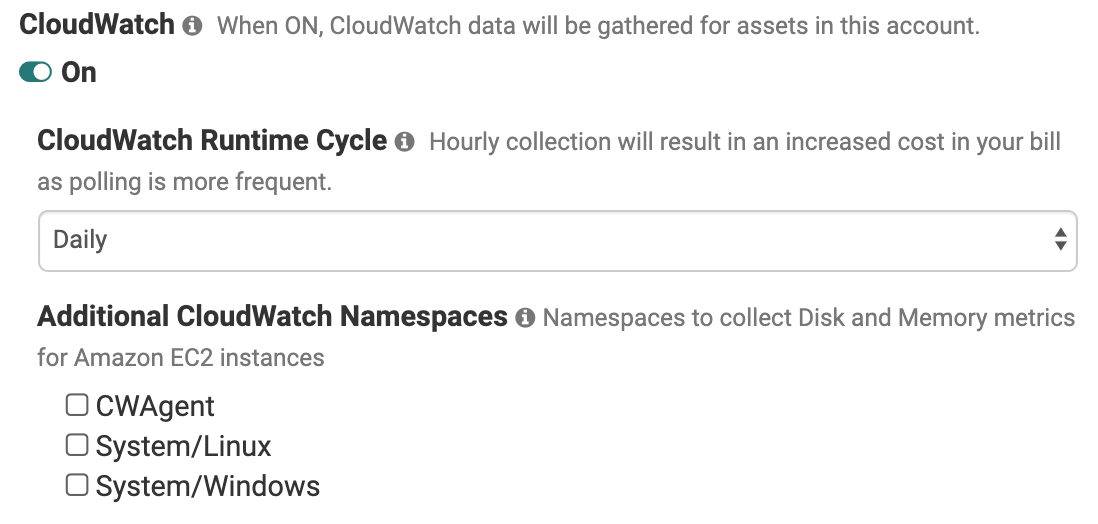
Enable CloudWatch (Optional)
Repeat the following steps for each account you want to enable CloudWatch metrics for.
-
Follow the instructions in AWS documentation to install and configure the AWS CloudWatch Agent in your EC2 Instances so that the agent can start collecting metrics from those instances. This process comprises the following high-level steps.
- Installing and configuring the CloudWatch Agent
- Creating IAM roles and users for use with the CloudWatch Agent
- Creating a CloudWatch Agent configuration file
For detailed instructions, see AWS documentation on Collecting Metrics and Logs from Amazon EC2 Instances and On-Premises Servers with the CloudWatch Agent.
-
Log in to the CloudHealth Platform. From the left menu, select Setup > AWS Accounts and edit each account for which you want to enable CloudWatch metrics collection.
-
Expand the Optional section of the account setup form and switch on the CloudWatch option.
-
Select the frequency at which the CloudWatch Runtime Cycle should run. Higher frequencies will incur greater cost due to increased API calls.
-
In order to enable CloudHealth to collect CloudWatch metrics from additional namespaces, select one or more namespaces from the list. Namespaces allow you to organize your CloudWatch metrics, which you can utilize for rightsizing your EC2 Instances using the CloudHealth Platform.
-
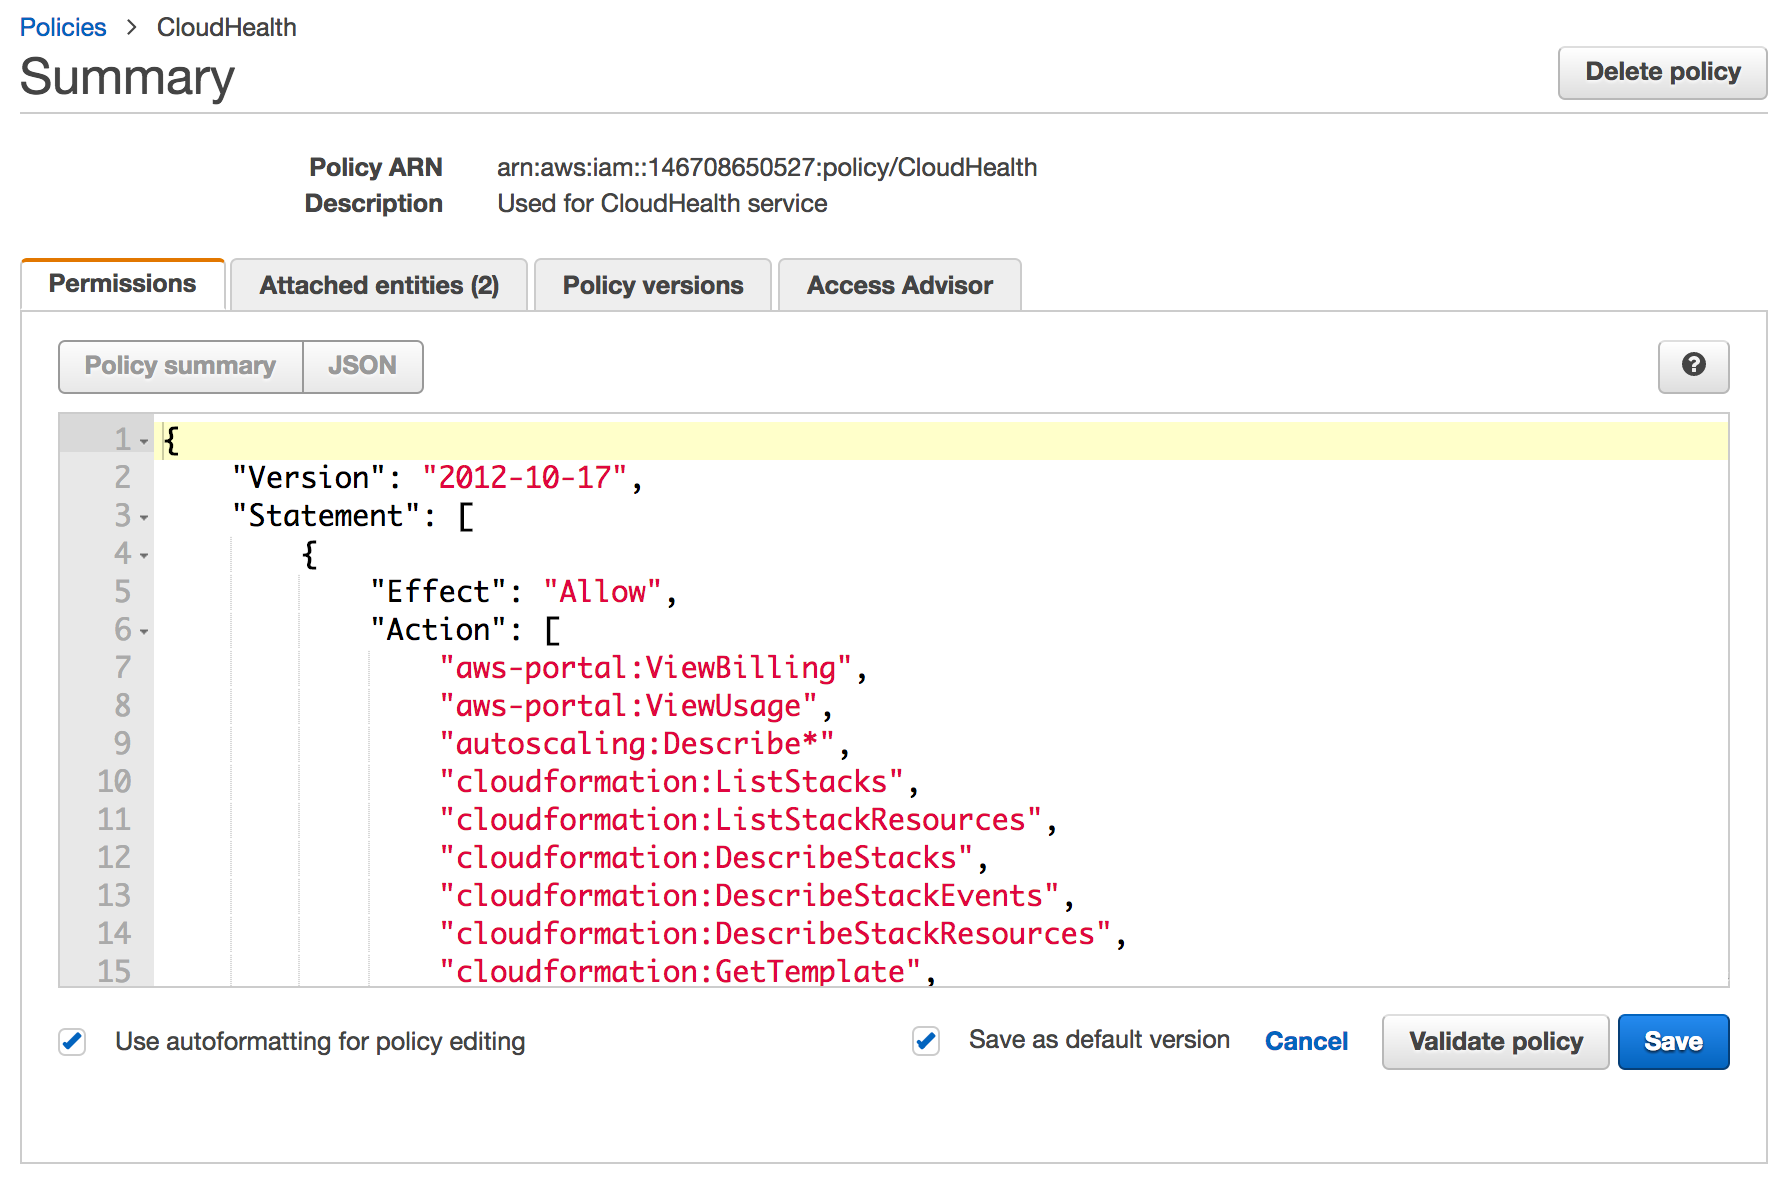
Update the policy associated with the IAM role for this account to grant CloudHealth permission to read your CloudWatch metrics. Click Generate Policy to produce a new IAM policy.
-
In the IAM Access Policy dialog box, click Select All and copy the contents to the clipboard.
-
In a separate browser window, log in to the AWS Console as an administrator and navigate to Services > Security, Identity, & Compliance > IAM. From the left menu, select Policies and locate the IAM Access Policy you are using for the CloudHealth Platform.
-
In the Permissions tab, click JSON and paste the policy you copied from the CloudHealth platform into the editor. Then click Save.
-
In the CloudHealth Platform, return to the AWS account you were editing and click Save Account.
CloudHealth validates the account and starts collecting data. If there are issues, a warning message appears. AWS CloudWatch metrics begin appearing in the CloudHealth platform after about 24 hours.
The spend-based asset collection feature considerably changes the initial asset collection time for a newly added account and service. Once a new asset or service is billed, it could take a minimum of 24 hours to appear in the CloudHealth reports. After the initial delay, the platform continues to update the asset or service details as per the standard collection frequency. For more information, see Spend-based Asset Collection.
Enable CloudTrail (Optional)
CloudTrail is a service that provides an audit log for all API access to AWS. CloudHealth can collect CloudTrail data to help you identify who launched or shut down infrastructure or made security changes across your infrastructure.
Typically, a single CloudTrail bucket collects logs for multiple accounts. Here are two scenarios to consider:
- If each of your accounts has its own bucket, enable CloudTrail for each account.
- If multiple accounts are feeding a single bucket, first enable CloudTrail for the account containing the bucket, and then [enable CloudTrail for each account that
feeds into the bucket](#cloudtrail-setup-for-additional-aws-accounts).
Enable an AWS Account for a CloudTrail Bucket
-
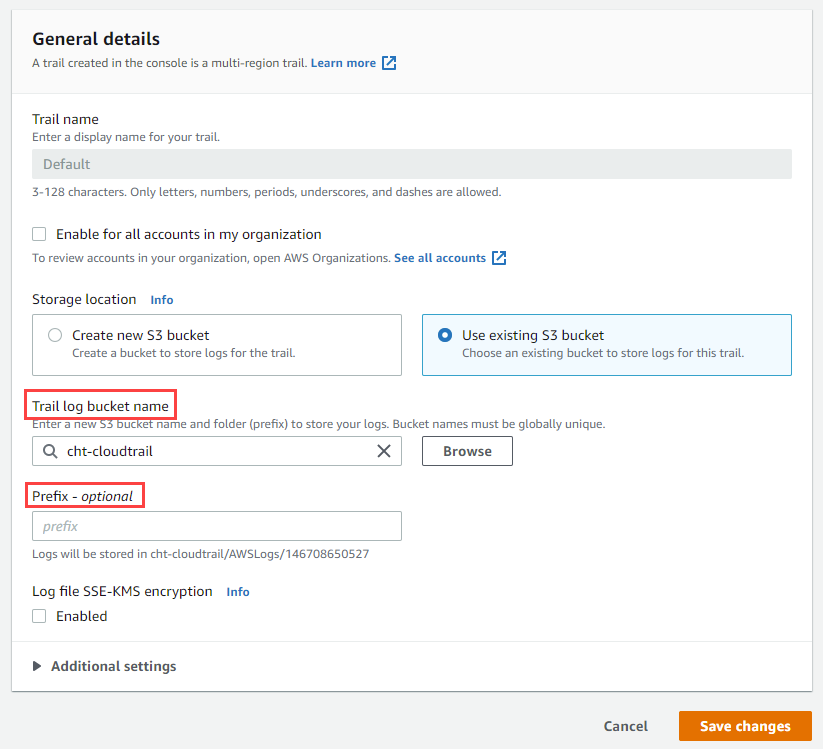
In the AWS Console, navigate to the CloudTrail service. In Dashboard, click the trail name to find the Name and Prefix for the S3 bucket configured to store the CloudTrail logs.
-
In the General details section, click Edit . The dialog box shows the name of the S3 bucket and any custom Log file prefix that is configured.
CloudHealth does not support creating trails for an organization, and therefore, each account needs to be configured independently.
- In a separate browser window, log in to the CloudHealth platform. From the menu, select Setup > AWS Accounts and edit each account that contains a CloudTrail bucket.
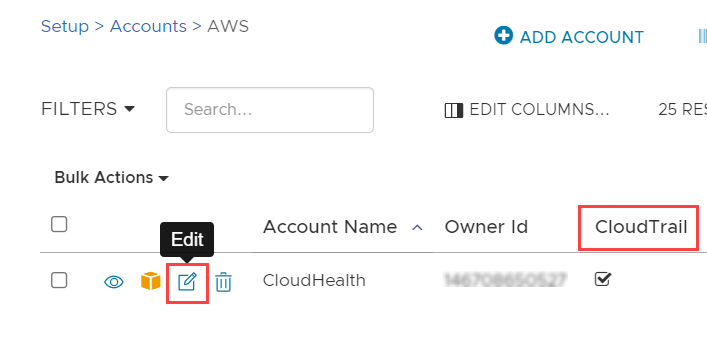
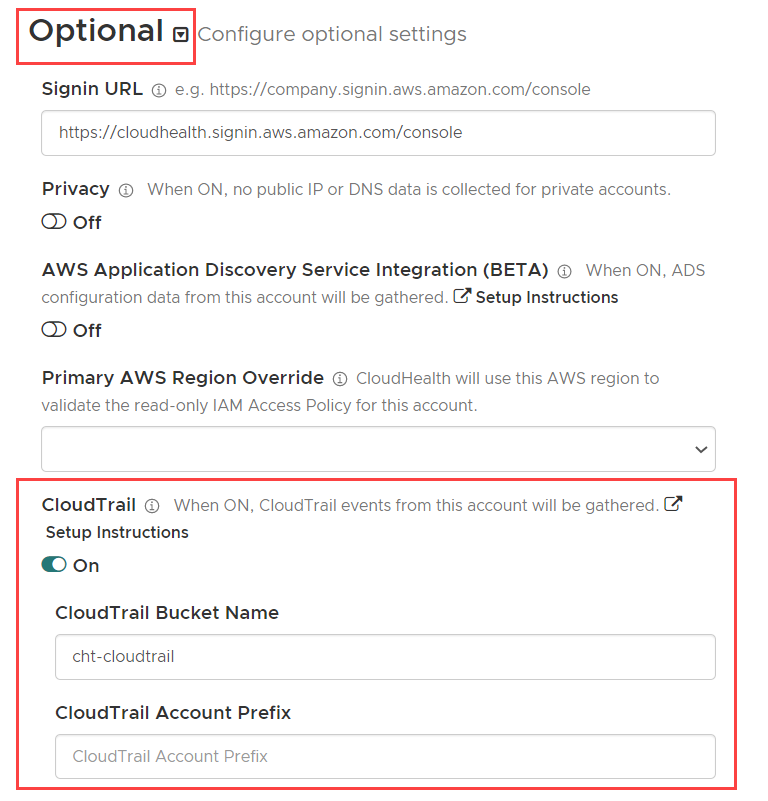
- Expand the Optional section of the account setup form and switch on the CloudTrail option.
-
Enter the CloudTrail Bucket Name and CloudTrail Account Prefix (if you configured a custom prefix).
-
Update the policy associated with the IAM role for this account to grant permission to read from the CloudTrail bucket. Click Generate Policy to produce a new IAM policy that grants access to the bucket entered in the previous step.
-
In the IAM Access Policy dialog box, click Select All and copy the contents to the clipboard.
-
Switch to the AWS Console and paste the policy in the Policy Document field. Then click Apply Policy.
-
Switch back to the CloudHealth platform and click Save Account.
CloudHealth validates the account and starts collecting data. If there are issues, a warning message appears. CloudTrail events begin appearing in the CloudHealth platform after about 15-30 minutes. More stable accounts tend to have few events.
- CloudHealth collects all events from 12:00 GMT on the day when the account is configured.
- If each of your AWS accounts has its own CloudTrail bucket, repeat steps 1-9 for each AWS account. If each of your AWS accounts feeds into a single bucket, proceed to the next section.
CloudTrail Setup for Additional AWS Accounts
Typically, CloudTrail is set up in AWS with multiple accounts feeding a single S3 CloudTrail bucket. You can think about the bucket as a file tree. Each account has a root location in the tree that is designated by the AWS Account ID. Beneath the root is the folder structure that contains the CloudTrail log files organized by date.
CloudHealth uses the AWS Account ID to scan the known CloudTrail bucket for the events for each account.
-
In the CloudHealth platform, from the menu, select Setup > AWS Accounts and edit the additional AWS account for which CloudTrail logs are being collected.
-
Expand the Optional section of the account setup form and switch on the CloudTrail option.
-
Enter the CloudTrail Bucket Name. You do not need to update the IAM policy for accounts other than the ones where CloudTrail buckets are located.
-
Click Save Account.
CloudHealth validates the account and starts collecting data. If there are issues, a warning message appears. CloudTrail events begin appearing in the CloudHealth platform after about 15-30 minutes. More stable accounts tend to have few events.
CloudHealth collects all events from 12:00 GMT on the day when the account is configured.